Most microbiological problems in cosmetics start long before the product reaches a consumer: in a tank, a hose, a filling nozzle or a sponge that was not cleaned properly. Good cosmetic production sanitation is the everyday routine that keeps tools and equipment from carrying microorganisms from one batch to the next. This guide explains the difference between cleaning and sanitising, a step-by-step cycle that works for small and large producers, the places that are most often missed, and how to check that your routine really works.
Contents
- The short answer
- Why it matters for the law and for your product
- Cleaning versus sanitising
- A cleaning cycle you can adapt
- Choosing a sanitising method
- The places that are most often missed
- Hold times, changeovers and records
- How to check that cleaning works
- Small producers and handmade cosmetics
- Frequently asked questions
- Key takeaways
The short answer
Clean first, then sanitise: remove visible product and residues with a suitable detergent, rinse, apply a sanitising step that fits your equipment and product, rinse again if needed, dry and protect the equipment until the next use. Write the routine down, record every cleaning, and verify it with simple checks and a microbiological test on the product. There is no single method that fits every product, so choose agents and contact times that suit your materials and formulas.
Why it matters for the law and for your product
The EU Cosmetics Regulation (EC) No 1223/2009 requires cosmetics to be manufactured in line with good manufacturing practice. Following the harmonised standard EN ISO 22716 gives a presumption of compliance, and that standard covers, among other topics, the cleaning and sanitation of premises and equipment. In the United States, FDA’s long-standing GMP guidelines for cosmetics also say that equipment and contact surfaces should be kept clean and sanitised at appropriate intervals, and the 2022 MoCRA law directs FDA to establish binding cosmetic GMP requirements.
Beyond the legal duty, there is a plain practical reason. A preservation system is designed to deal with the contamination of normal use, not with a heavily contaminated production line. A batch that exceeds microbial limits can often be traced back to hygiene rather than to the formula, and a good challenge test result does not make up for a dirty line.
Read also How to Prevent Contamination in Cosmetic Production
Cleaning versus sanitising
- Cleaning removes visible product, oils, powders and soil, usually with water and a detergent and some mechanical action such as brushing or flushing.
- Sanitising (or disinfecting) reduces the number of microorganisms on a clean surface using heat or a chemical agent for a defined contact time.
The order matters. Residues protect microorganisms and use up many sanitisers, so a sanitising step on a dirty surface gives a false sense of security. The terminology and the expected level of reduction can differ between sources, so define in your own procedure what each step has to achieve.
A cleaning cycle you can adapt
- Empty and scrape. Drain the equipment completely and remove thick residues by hand or with a clean scraper.
- Pre-rinse. Use warm water where the formula allows it, to loosen product, and discard the first rinse.
- Wash with detergent. Choose a detergent that dissolves your product type; brush or circulate it for the defined time.
- Rinse. Rinse until no detergent remains, using water of suitable quality.
- Sanitise. Apply heat, steam or a chemical sanitiser at the defined concentration and contact time.
- Rinse again if needed. Some sanitisers must be rinsed off; others evaporate. Follow your supplier’s data sheet.
- Dry. Allow to drain and dry fully; damp equipment is where microorganisms recover.
- Protect and label. Cover or close the equipment and label it as cleaned, with date, name and the next permitted use.
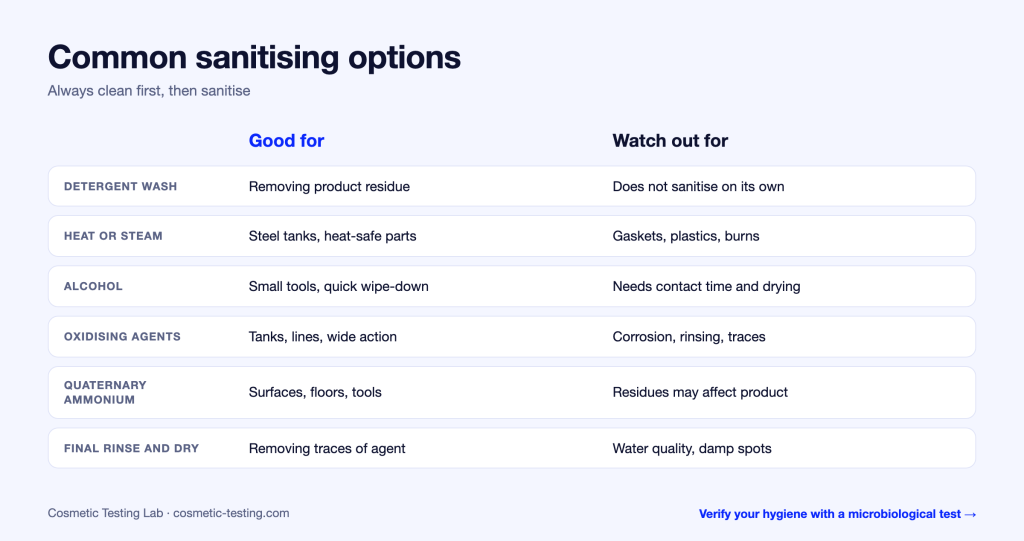
Choosing a sanitising method
There is no universal best choice. Consider the material of your equipment, the formula that follows and the people who work with the agent.
- Heat or steam. Very effective on stainless steel and heat-tolerant parts; check gaskets, hoses and plastics, and protect operators.
- Alcohol. Practical for small parts and tools because it evaporates; it needs full coverage and contact time, and is not a replacement for cleaning.
- Chemical sanitisers. Options include oxidising agents and quaternary ammonium compounds. Check material compatibility, rinse requirements and whether traces could affect the next product or its preservatives.
Whichever you choose, write down concentration, preparation date and contact time. Diluted solutions can lose strength or become contaminated, so many sites prepare them fresh on a set schedule.
Read also How Often Should You Test Production Batches?
The places that are most often missed
- Valves, gaskets, O-rings and clamps, where product collects in small gaps.
- Hoses, transfer pumps and filling nozzles, especially at joints and dead ends.
- Lids, agitator shafts and the underside of mixing heads.
- Sampling ports and thermometer pockets.
- Scoops, spatulas, funnels and measuring jugs that wander between batches.
- Drains and wet floors close to open equipment.
- Sponges, cloths and brushes themselves, which can become a source of contamination.
Surfaces that stay wet and coated can develop a biofilm, a layer of microorganisms that is hard to remove and sheds cells into the product. Regular mechanical cleaning is the best defence.
Hold times, changeovers and records
Set two time limits. The dirty hold time is the longest that soiled equipment may wait before cleaning. The clean hold time is how long cleaned equipment may stay unused before it must be sanitised again. Both should be based on your own experience and checks.
At changeover, think about carry-over as well: a fragrance, colour or active left in a line affects the next product, and moving from an oil-based to a water-based formula calls for thorough cleaning and drying. Keep a log with date, equipment, product just made, cleaning steps, agents with their lot numbers, concentrations, contact times and the name of the person responsible. If something goes wrong, those records let you find the cause.
How to check that cleaning works
- Look and smell. Visual inspection catches residues, but it cannot see microbes.
- Surface swabs or contact plates. A laboratory counts microorganisms on cleaned surfaces. Set your own alert and action limits from baseline data, because there are no universal surface limits for cosmetics.
- Final rinse water. Sampling the last rinse shows whether residues or microorganisms remain.
- Rapid residue tests. Some producers use quick tests for organic residues as an extra check.
- Product testing. A microbiological specifications test on the first batch after cleaning, and on routine batches, shows whether the routine protects the product.
Review the results regularly. A rising trend is a warning to act before a batch fails.
Read also ISO 17516 Cosmetics: Microbiological Limits Explained
Small producers and handmade cosmetics
A small workshop can reach the same goals with simple means: stainless steel, glass or heat-resistant plastic instead of wood; dedicated equipment for the cosmetic production; hot water and detergent followed by sanitising and air drying on a clean rack; single-use wipes or clean cloths; and a written routine that anyone can follow. Your CPSR assessor will want to know the basics of your hygiene approach.
Frequently asked questions
Is wiping equipment with alcohol enough?
Alcohol is a useful sanitising step on clean, dry equipment, but it does not remove residues, so it should follow cleaning, not replace it.
How often should I clean and sanitise?
At the end of every production run, between different products, and before use if the equipment has been standing longer than your clean hold time. The exact rule belongs in your procedure.
Do I need to test surfaces?
Not by a fixed rule. Surface checks are a practical way to verify your routine, especially when you start, change agents or equipment, or see unexpected results in product testing.
Key takeaways
- Clean first, then sanitise, rinse where needed, dry, and protect the equipment.
- Check the hard-to-clean points such as gaskets, hoses, nozzles and sampling ports.
- Keep written procedures and records, including agents, concentrations, contact times and hold times.
- Verify the routine with swabs or rinse water and with microbiological testing of the finished product.